by Stan Ware
From time to time on the last forum I had some articles about things of interest in the gun industry. As time permits I will do some more which may be of interest to some. Feel free to comment on them objectively. This time we are going to talk a little bit about Glass bedding your rifle. It will primarily be intended for the 700 Remington, but may apply to Bench Rest rifles also. The reason being, it is a round bottom receiver and that is somewhat different than flat bottom receivers. It was once said to me by Dan Hackett that glass bedding a rifle is not Rocket Science, Stan. Danny is 100 per cent right, it is not, but if not done correctly, it can cause more harm than good. I get to see a lot of Bedding Jobs some from other smiths and some from do-it yourselfers. I get nervous when I'm going to build a rifle and the customer says I will glass bed it,you do the rest. Fine with me but, if the rifle does not shoot, and I find it to be the glass job, you will pay for my time and headache, period, no exceptions.
One of the main objectives if not the most important is Stress you don't want any on the receiver. Case in point, recently at Mill Creek, Dave Green, with a new glass job on his new gun (doesn't make any difference who did it) was having trouble grouping. As I came upon the crowd discussing the problem, Al Nyhus was checking things out and had found that the receiver (flat bottom in this case) was hitting, I believe in the rear and on the sides. If memory serves me correct, Dave ran home that night some 60 miles and scraped out some un-needed glass and was back in he morning to check it out. Dave Green shot very well the next day and if Dave should happen to see this post he may have some to add. The point being that there was some stress someplace and once it is relieved things change and usually for the better.
Here are some things to look for in the 700 that can cause problems.
First of all you should make it into a two point bedding system. In other words about a inch or so behind the lug and the small area around the rear tang screw should be contacting the receiver and everything in between should be free(i.e. the receiver should not be touching anyplace in between the two bedding points.) The first thing you should do is take off the scope and if it's a one piece base, be sure to remove. One piece bases most of the time cause stress on the receiver. Then the trigger assembly should be removed and of course the bolt. Basically we want a stripped action.
If the stock is going to be pillared, now is the time to do that. I am not going to dwell a lot on pillars, but there are a few rules one should follow. I make my own but the ones from Brownell's or Charlie Robertson are fine and work very well. The action screws have to be drilled out to the size pillar your going to be using and cut to proper length. I have made up some special screws for that with threads cut in the lathe and in doing so the threads are concentric and straight with the screw. The pillar I use is 1/2 inch diameter with a 5/16 hole in them. The pillar is then attached to the receiver by the screw and is also a guide to make sure the trigger guard is in the right position to go back into the stock. This also assures that the receiver is straight and where it should be. The holes you drilled in for the pillars should be a little larger than the 1/2 inch pillar and when inserted with the receiver they should give no resistance to the stock. Remember we don't want any stress.. I normally glue in the pillars and then the rest of the receiver. You can do it as you like. I normally set the action in that has Prussian Blue on it to find the high spots if done correctly the pillars you just installed will have blue on them and if the wood has it on you must remove so just the two pillars are hitting the receiver. I then wax the receiver for release agent and install glass and receiver in place. I use ProBed 2000 but there are also some other good one's out there. I set the rifle in the same position as if I were shooting it on the bench and let cure for 72 hours.
After removing from glass you should clean up the access etc and then begin the process of putting it back together.
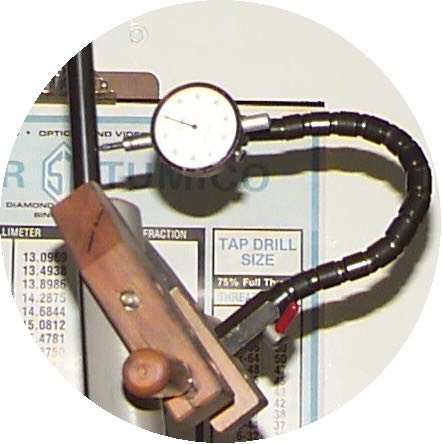
This is where the Gizmo that you see in the picture comes in. It is just a simple wood workers clamp with a dial indicator on it. What you use if for is to check to see how good your glass job is.
With the action in the newly glassed stock and the gun in the vertical position.( I usually clamp in the vise..) make sure the barrel is plumb in both directions. Do not touch the stock anywhere. If you have to hang on do it about where you have it in the vice.
Tighten the front screw first and then the rear like you normally would. Just like you were going to use it. Now set the indicator in the zero position and then loosen the front receiver screw and watch the gauge It should not move.
Then re-tighten and loosen the rear screw same thing should not move.. if it does you bed job has a high spot in it and must be removed. To check use the Prussian blue again and find the spot where the receiver is hitting or you may have a high spot. When you have this done you may move to step two which is to install the one piece base and do the check again you may find that things have changed. If so, you might think about going to to two piece bases and this normally cures the problem. If you do the two piece bases be sure to lap the rings in so that when you install the scope you don't set up some stress.
In step three you should install the magazine box and do the test you will find in most cases that this will give you a problem. The magazine box should be free and clear also. You will have to remove some wood until the test shows ok. Along with this, you should do the trigger guard at the same time.
One of the problems with the trigger guard is that it has self centering screws. What happens when you tighten the screws being they are self centering the trigger guard pushes off the side and if it hits the stock it will put stress on the receiver. Something we don't want. You then can put the Prussian blue on the trigger guard and remove the spots where it hits the wood or change the screws to flat bottom ones.. which is not advised unless you have a lathe and tooling.
A lot of people don't think of the trigger guard as part of the glass bed job, but it is and side stress is also bad. Last we put the trigger assembly back in and do the test. Normally this will not give you a problem but if it does you have to remove the high spots.
If, after all this, the Dial indicator still does not move when tightening the actions screws you have a good bed job and you know that the Glass job you did is not taking any accuracy away from the barrels potential.
This article was intended to help you locate some of the problems you may find in your glass job and was not necessarily intend to show you how to glass bed. If you don't want to make a jig like mine and have a Collimator that can also be use for testing the bed job. Install the scope and Collimator and the cross hairs should not move on the grid of the Collimator. SGR